How to Fix Loose Sofa Legs: Complete Step-by-Step Repair Guide
Stop living with a wobbly sofa. Learn proven methods to diagnose, fix, and prevent loose sofa legs — from simple tightening to full leg replacement.
A wobbly sofa is more than just annoying — it can damage your flooring, stress the frame joints, and even become a safety hazard. Loose sofa legs are one of the most common furniture problems, yet most people either ignore them or assume the entire sofa needs replacing. The truth is, fixing loose legs is usually straightforward, inexpensive, and something you can handle yourself in under an hour.
This guide walks you through every stage of the repair process: understanding why legs come loose in the first place, gathering the right tools, choosing the correct repair method for your specific situation, and knowing when it makes more sense to replace the legs entirely. Whether your sofa has threaded bolt-on legs, screwed-in wooden legs, or a more complex attachment system, you will find a solution here.
For a broader look at common sofa issues, check out our guide on common sofa problems and fixes, or explore the full sofa maintenance section for cleaning, protection, and repair tips.
Table of Contents
- Why Sofa Legs Become Loose
- How to Diagnose Which Leg Is the Problem
- Essential Tools You Will Need
- Method 1: Simple Tightening
- Method 2: Fixing Stripped Holes with Wood Filler
- Method 3: Using Thread Inserts or T-Nuts
- Method 4: Reinforcing with Corner Brackets
- Method 5: Full Leg Replacement
- Comparison of All Repair Methods
- Preventive Maintenance Tips
- When to Call a Professional
- Frequently Asked Questions
Why Sofa Legs Become Loose
Before reaching for your tools, it helps to understand what caused the looseness in the first place. The root cause determines which repair method will give you the most durable result. Here are the most common reasons sofa legs go wobbly:
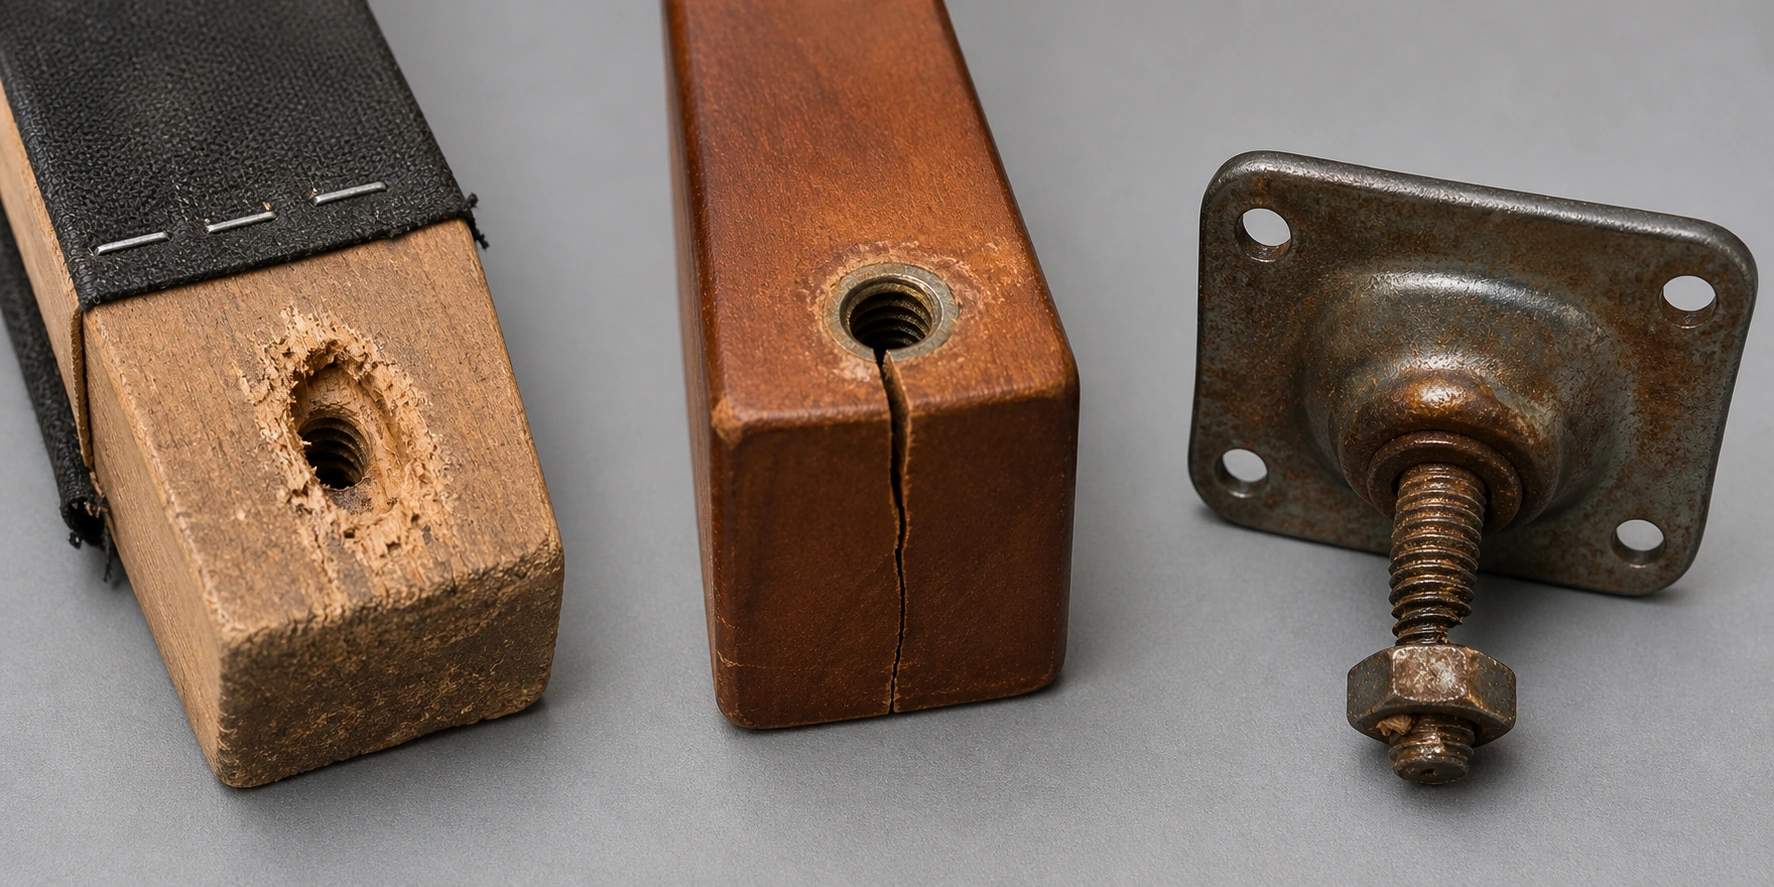
- Stripped screw holes — The most common cause. Repeated tightening and daily use gradually widen the hole in the wood until the screw can no longer grip.
- Loose bolts or nuts — Bolt-on legs use a hanger bolt threaded into the frame and a nut or plate on the outside. Vibration causes these to gradually back out.
- Cracked or split wood — If the frame wood near the leg mount has cracked, no amount of tightening will help. The wood itself has lost its structural integrity.
- Worn mounting plate — Metal mounting plates can bend, strip, or rust over time, especially on softer frame materials.
- Uneven flooring — Sometimes the legs are fine but the floor has settled or shifted, making the sofa rock. Always rule this out first.
- Daily wear and vibration — Normal use, kids jumping on the sofa, or frequent moving creates micro-movements that slowly loosen connections over months and years.
Quick Test: Place the sofa on a known flat surface (like a concrete garage floor). If it still wobbles, the problem is with the legs or frame — not your floor. This simple test saves time and prevents unnecessary repairs.
How to Diagnose Which Leg Is the Problem
Many people assume all four legs need fixing, but usually only one or two are the culprits. A systematic diagnosis saves time and helps you target the right repair. Follow these steps:
- Place the sofa on a flat, hard surface. A piece of plywood on carpet works well if you cannot move the sofa.
- Sit on each corner of the sofa one at a time. The corner that dips or rocks the most indicates the loose leg.
- Flip the sofa carefully onto its back or side (use a blanket to protect the upholstery). Enlist help if the sofa is heavy, especially for a sectional sofa or larger model.
- Visually inspect each leg attachment point. Look for gaps between the leg and frame, visible screw movement when you wiggle the leg, cracked wood, or missing hardware.
- Try wiggling each leg individually with your hand. The one with the most play is your primary target.
- Check the thread condition — remove the bolt or screw and inspect whether the threads in the wood are intact or stripped.
Once you have identified the problem leg and the specific type of damage, you can select the appropriate repair method from the options below.
Essential Tools You Will Need
Gather your tools before starting. Having everything within reach makes the job faster and reduces the chance of losing small hardware. You likely already own most of these items.
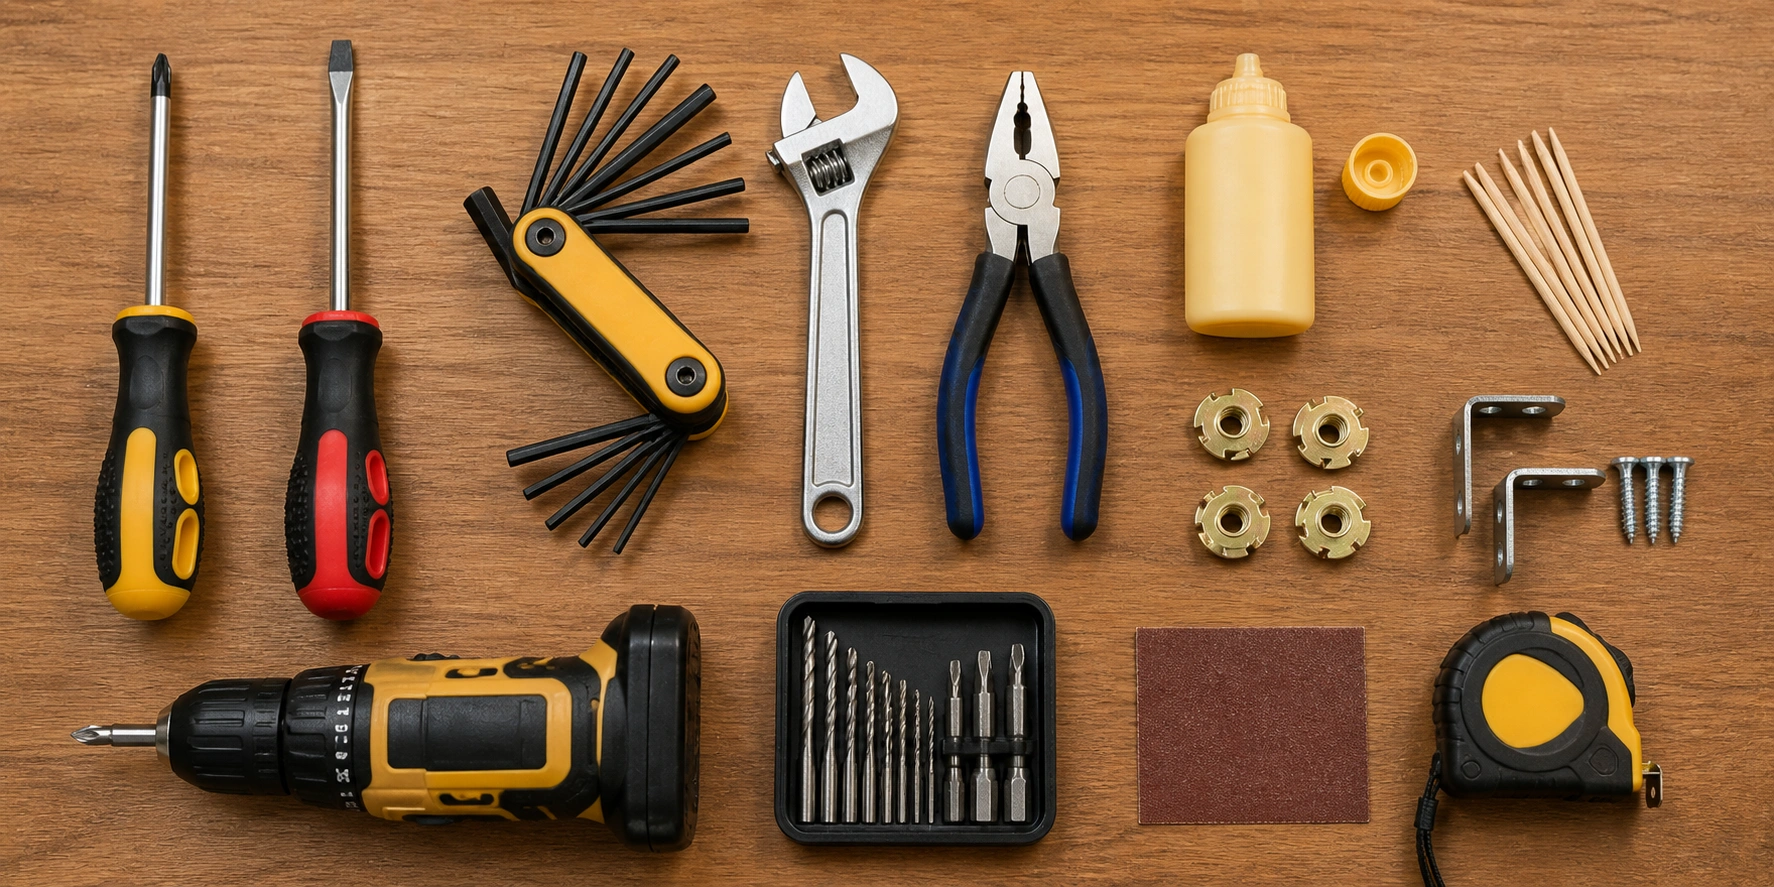
Pro Tip: Take photos of each leg attachment before you disassemble anything. This makes reassembly much easier, especially if the hardware configuration differs between legs.
Method 1: Simple Tightening
This is the first method to try and resolves roughly 30–40% of loose leg problems. If the screws or bolts are simply backed out but the wood threads are still intact, tightening alone will fix the issue permanently.
Step-by-Step Process
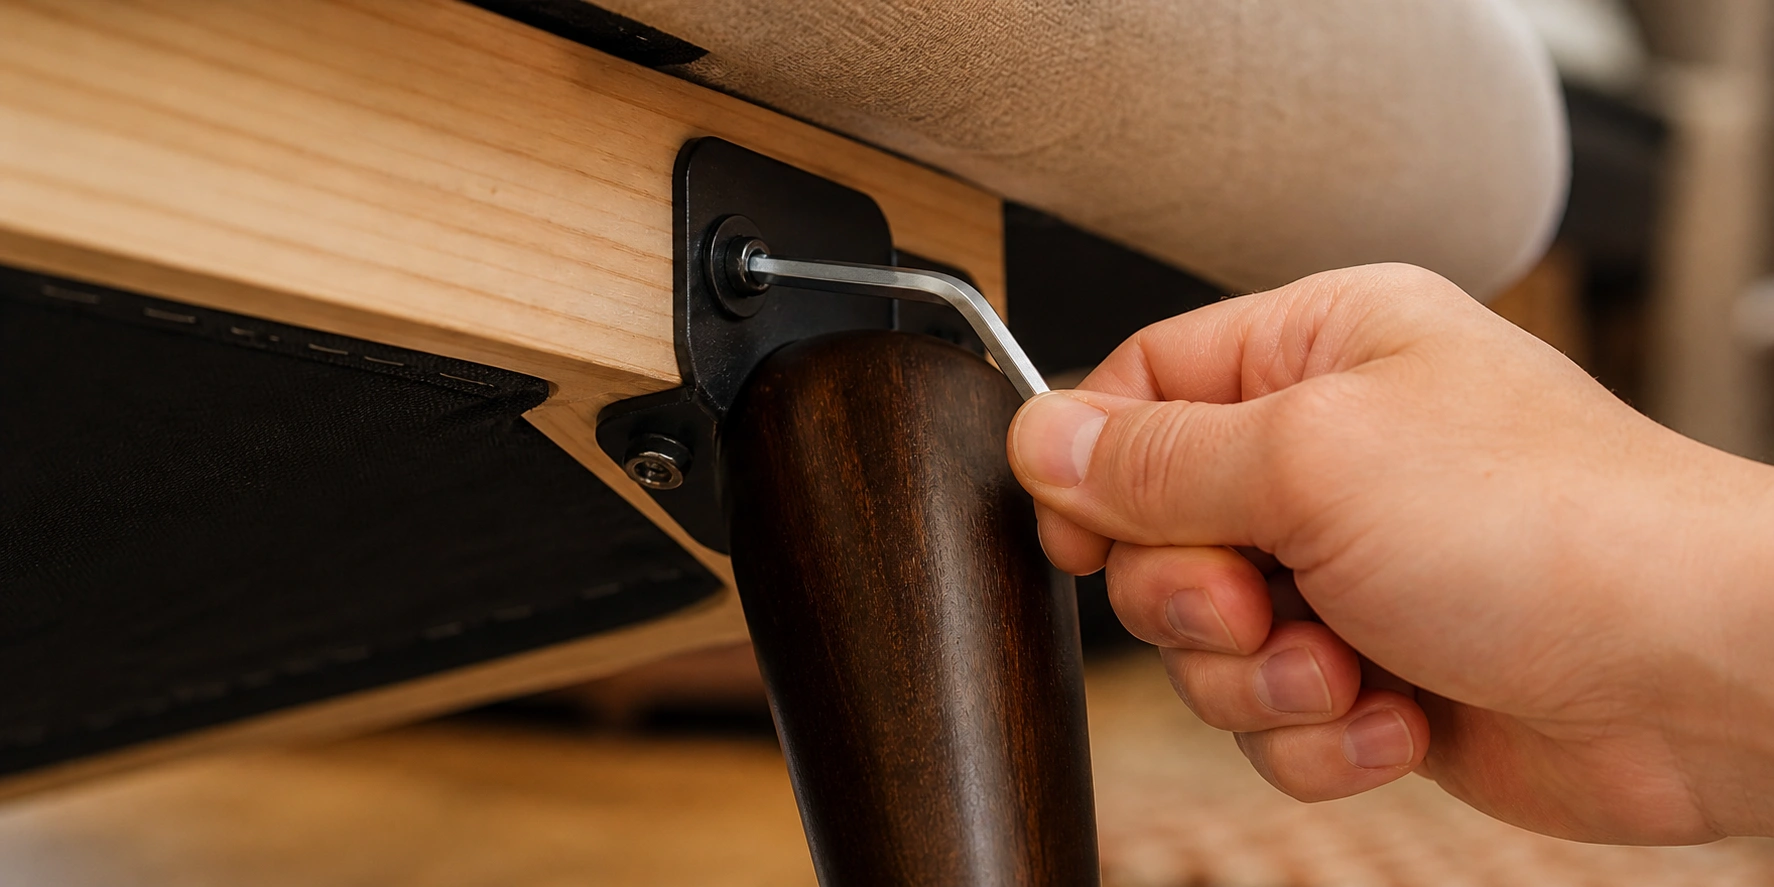
- Identify the fastener type — Phillips screw, flathead screw, Allen bolt, or nut-and-bolt configuration.
- Select the correctly sized tool. Using the wrong size is the number one cause of stripped screw heads.
- Apply firm, steady pressure while turning clockwise. Avoid jerky movements.
- If the fastener spins freely without catching, the hole is stripped — move to Method 2.
- Once tight, test the leg by wiggling it. If there is still play, the hole may be slightly widened. Try adding a small wood toothpick dipped in wood glue alongside the screw for extra grip.
- Repeat for all legs, even if only one felt loose. Preventive tightening extends the life of all connections.
Warning: Never over-tighten. Excessive force can crack the frame wood, strip the threads, or snap the bolt head off, turning a simple fix into a bigger problem. If the screw stops turning with moderate resistance, stop — it is tight enough.
Time Required: 5–10 minutes for all four legs. Cost: $0 (tools you already own). Durability: 6–12 months for moderately worn holes; permanent if threads were still intact.
Method 2: Fixing Stripped Holes with Wood Filler
This is the most popular DIY repair method and works exceptionally well for wooden legs screwed directly into a wood frame. The concept is simple: fill the widened hole with new material so the screw has fresh wood to bite into.
What You Need
- Wood glue (PVA or hide glue — avoid superglue as it is brittle)
- Wooden toothpicks or wooden matchsticks (without the head) or small dowel pieces
- Side cutters or scissors
- Your original screw or bolt
Step-by-Step Process
- Remove the leg and the loose screw completely. Clean out any loose wood chips or debris from the hole.
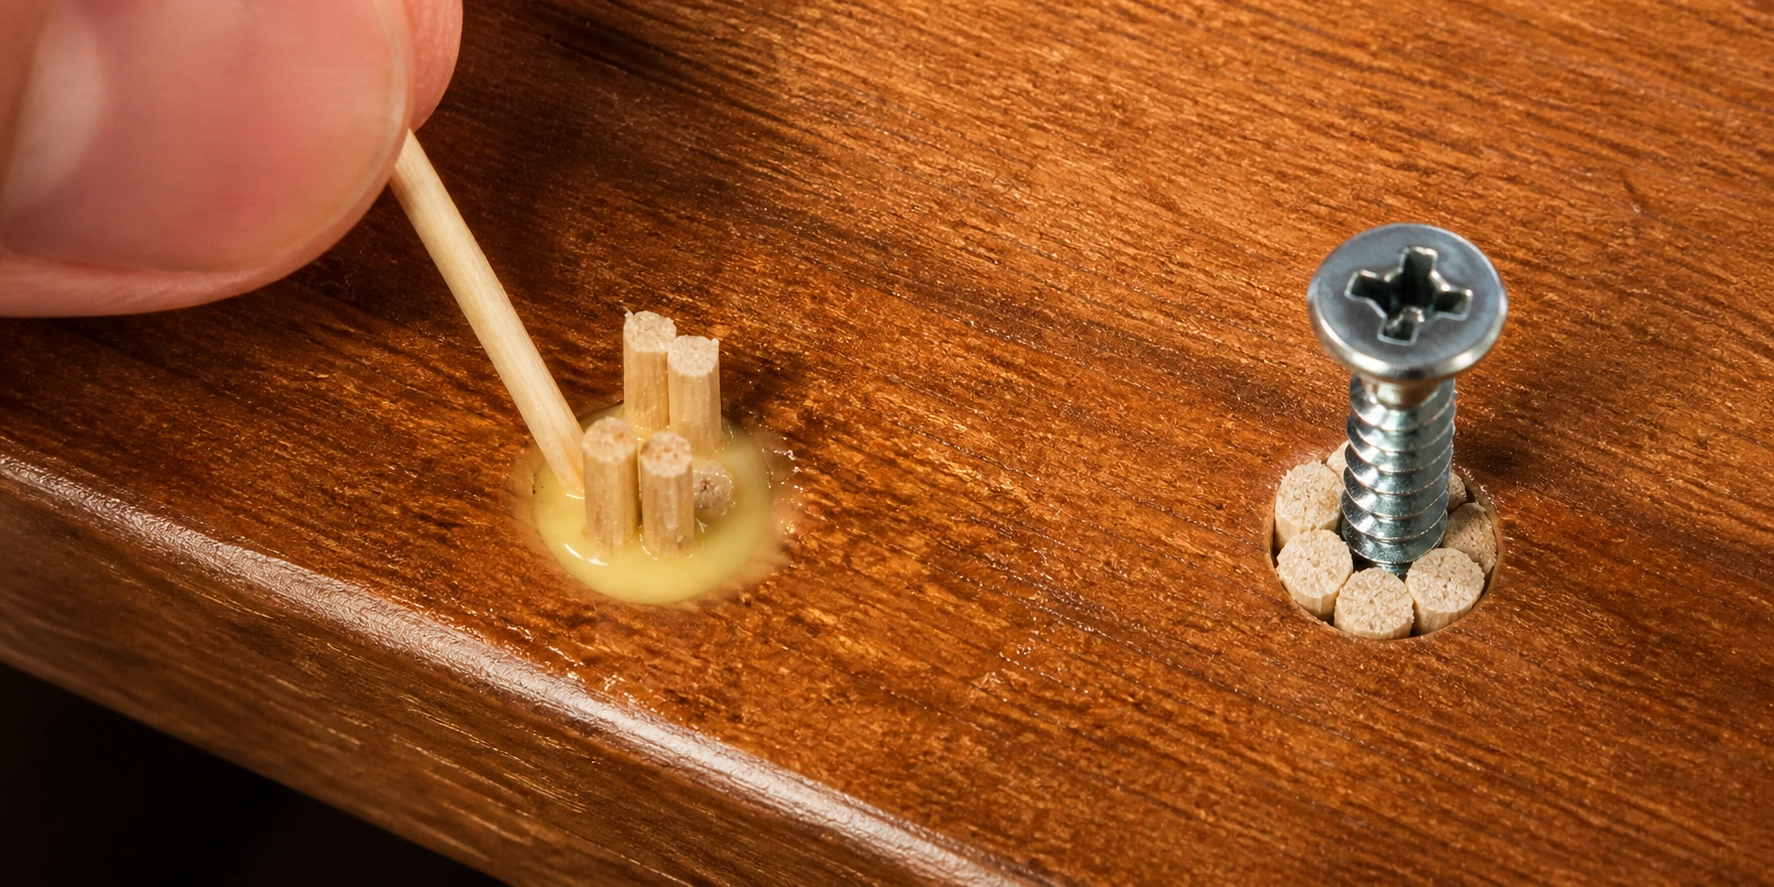
- Apply a generous amount of wood glue into the stripped hole, coating the inner walls thoroughly.
- Stuff toothpicks or matchsticks into the hole, packing them as tightly as possible. You typically need 4–8 toothpicks per hole depending on the hole size.
- Break or cut off the toothpicks flush with the surface of the wood. Do not leave protruding pieces.
- Let the glue dry completely. Most wood glues need 1–2 hours for initial set and 24 hours for full cure. Do not rush this step.
- Once fully dry, optionally drill a small pilot hole (slightly narrower than the screw diameter) to guide the screw and prevent splitting the filler.
- Drive the original screw into the repaired hole. It should feel firm and resistant — that is the new wood gripping the screw threads.
Better Alternative: For a stronger repair, use a hardwood dowel instead of toothpicks. Drill the stripped hole to a uniform diameter (typically 3/8 inch), coat a hardwood dowel in glue, tap it in, let it cure, cut it flush, and drill a new pilot hole. This creates a solid block of hardwood that is actually stronger than the original material.
Time Required: 30 minutes active work + 24 hours drying time. Cost: $2–$5 for glue and toothpicks. Durability: 1–3 years typically, often longer with the dowel method.
Method 3: Using Thread Inserts or T-Nuts
This is the most durable and professional-grade repair method for bolt-on sofa legs. Thread inserts (also called helical inserts or Heli-Coils) and T-nuts create a metal-to-metal thread connection that will not strip, loosen from wood expansion, or degrade over time.
Understanding the Two Options
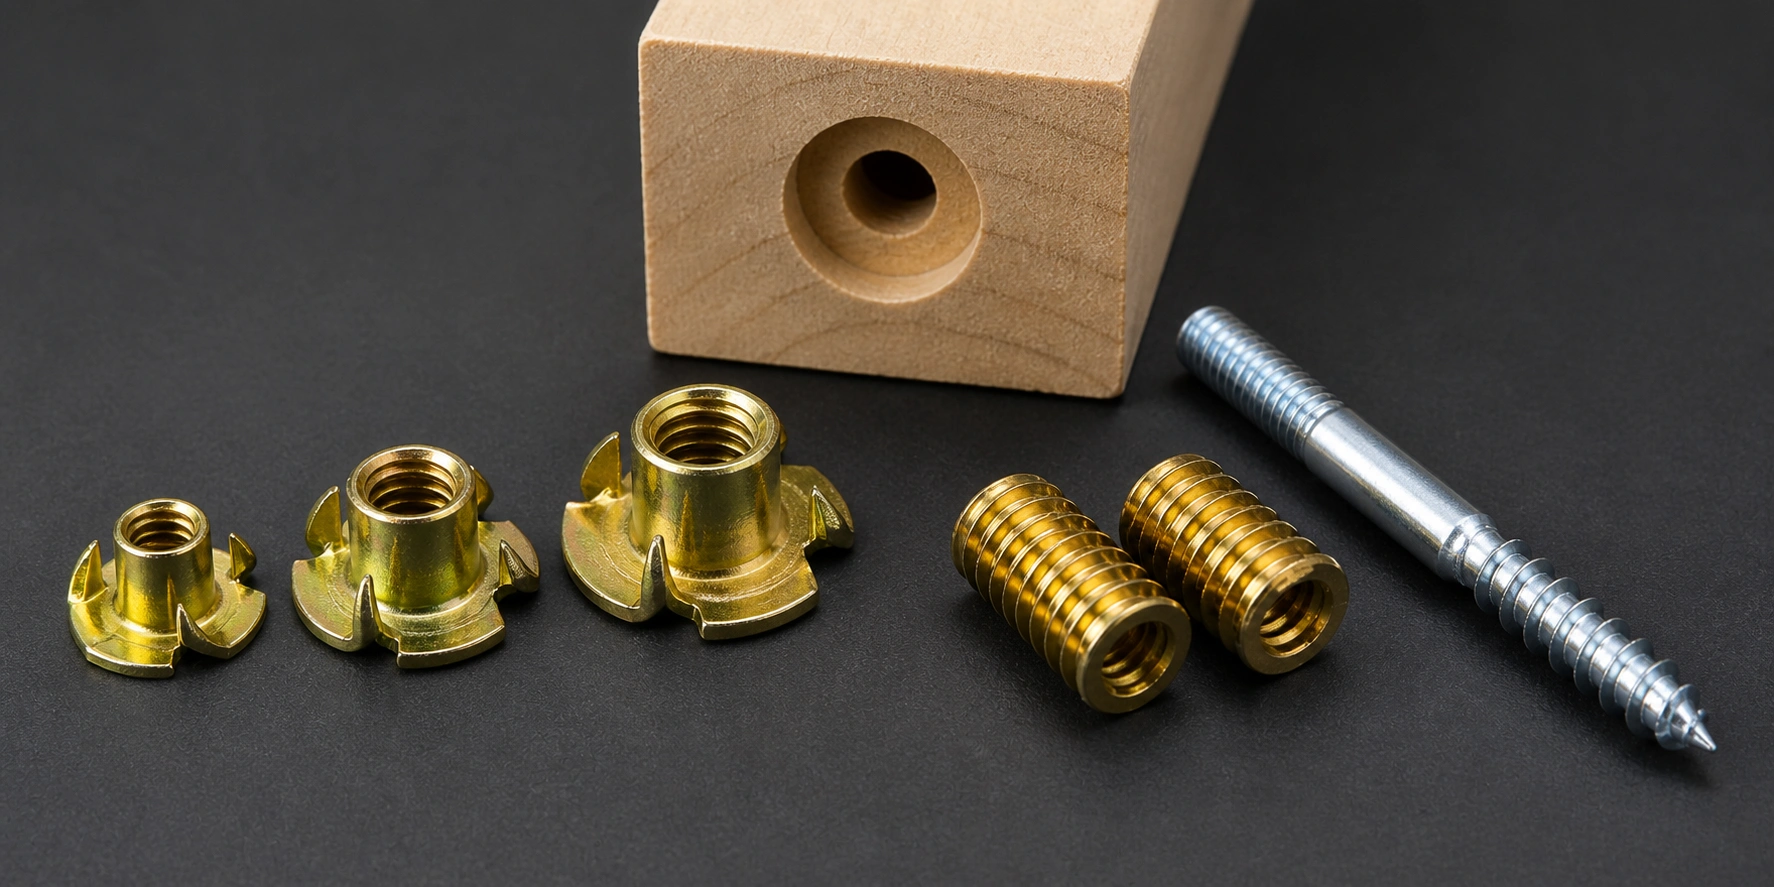
T-Nuts (Barrel Nuts)
Pronged metal barrels with internal threads. Hammered into a pre-drilled hole. The prongs dig into the wood to prevent spinning. Best for thicker frame pieces where you have access to drive them in from the outside. Inexpensive and very strong.
Threaded Inserts
Brass or steel cylinders with external threads (like a screw) and internal threads (for the bolt). Screwed into a pre-drilled hole using a special driver or a bolt with two nuts locked together. Best for situations where the frame thickness is limited or where you want the cleanest appearance.
Step-by-Step Process (T-Nut Method)
- Determine your bolt size. Most sofa leg bolts are M8 (8mm), M10 (10mm), or 5/16 inch. Check by measuring the bolt diameter or matching it to a thread gauge.
- Purchase matching T-nuts. They must have the exact same internal thread size as your existing bolts.
- Drill a hole in the frame at the leg attachment point. The hole diameter should match the outside diameter of the T-nut barrel (typically 1–2mm larger than the internal thread size). Drill to a depth equal to the T-nut length.
- Insert the T-nut into the hole with the prongs facing outward (toward you). The flange should sit flush against the wood surface.
- Tap the T-nut in firmly with a hammer or use a clamp to press it in. Ensure it sits flat and does not tilt.
- Thread your existing bolt through the sofa leg and into the T-nut. Tighten securely — the metal-on-metal connection should feel solid with zero play.
Important: Always match the thread size exactly. An M8 bolt will not work in a 5/16-inch T-nut even though they look similar (8mm = 0.315 inch vs 5/16 = 0.3125 inch). Using the wrong size will cross-thread and destroy both the insert and the bolt. If you are unsure, bring the bolt to the hardware store for matching.
Time Required: 20–30 minutes per leg. Cost: $3–$8 for a pack of T-nuts. Durability: Essentially permanent — metal threads do not degrade like wood threads.
Method 4: Reinforcing with Corner Brackets
Sometimes the leg-to-frame connection needs additional mechanical support beyond the primary fastener. Metal L-brackets (corner brackets) create a secondary attachment point that dramatically increases rigidity. This method is especially useful when the frame wood near the leg mount has started to crack or when the leg has a lot of lateral play even after tightening.
When to Use This Method
- The frame wood shows hairline cracks near the leg mount
- The leg has side-to-side wobble even after tightening or rethreading
- You want a belt-and-suspenders approach for a heavy 4-seater sofa or deep-seat sofa
- The original mounting system was inherently weak (e.g., single screw attachment)
Step-by-Step Process
- Select small metal L-brackets (1.5 to 2 inches per side). Choose brackets with multiple screw holes for maximum grip.
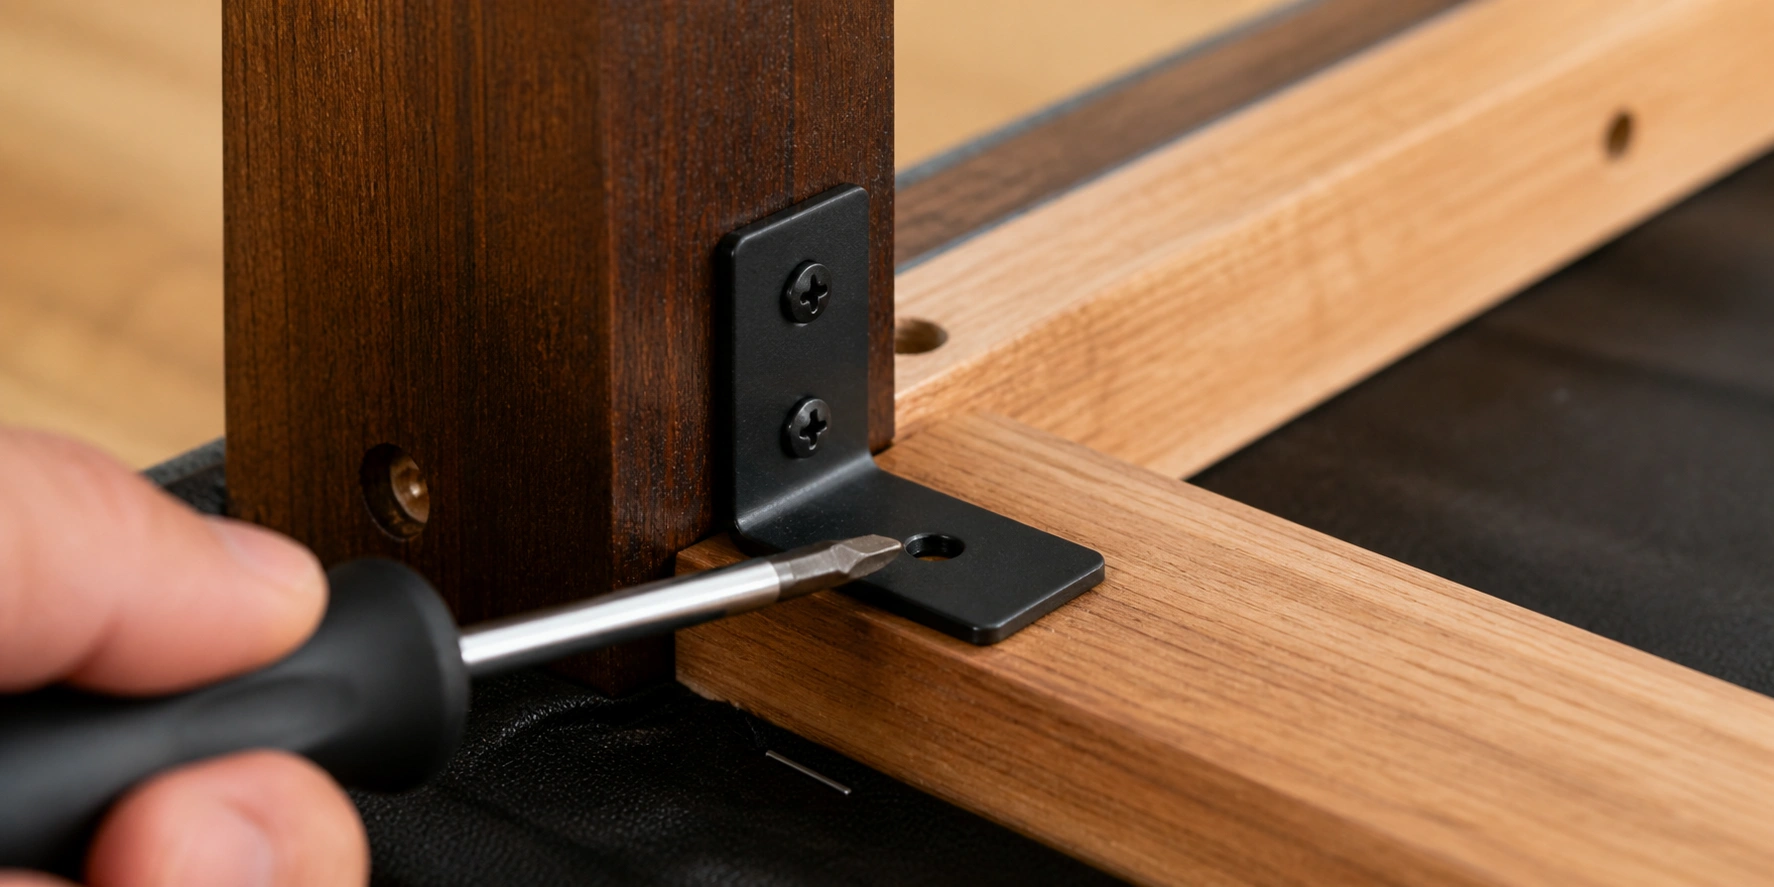
- Position the bracket so one side sits flat against the sofa leg and the other side sits flat against the frame rail. The bracket should be oriented to resist the direction of wobble.
- Mark screw locations with a pencil. Use short screws (3/4 inch or less) to avoid puncturing through visible surfaces.
- Pre-drill pilot holes at each marked location to prevent wood splitting.
- Drive the screws through the bracket into both the leg and the frame. Tighten firmly but do not over-torque.
- Test the leg — it should now feel rigid with zero lateral movement.
Aesthetic Tip: If the brackets will be visible, choose black or brushed nickel finishes that complement your sofa's style. For modern sofas with exposed legs, matching the bracket finish to the leg color keeps the look intentional rather than patched.
Time Required: 15–20 minutes per leg. Cost: $4–$10 for brackets and screws. Durability: Very strong when combined with a proper fastener repair — adds years of stability.
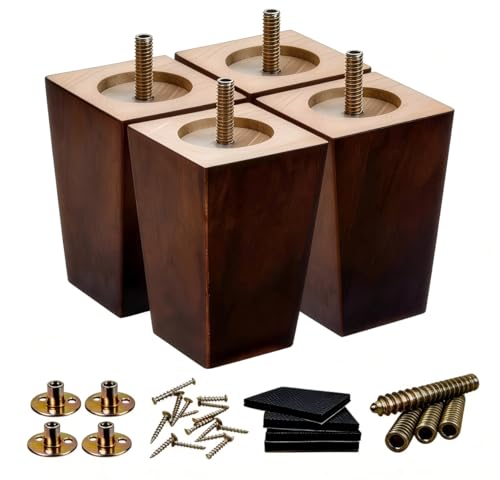
Method 5: Full Leg Replacement
When the leg itself is cracked, split, or severely damaged, or when the frame mounting point is too degraded for any repair method, replacing the legs entirely is the most practical solution. Fortunately, replacement sofa legs are widely available, affordable, and easy to install.
How to Choose the Right Replacement Legs
- Thread size — This is critical. Remove your existing leg and measure the bolt diameter and thread pitch. Common sizes are M8, M10, 5/16-18, and 1/4-20. The replacement must match exactly.
- Height — Measure from the bottom of the frame rail to the floor. Replacement legs should match within 1/4 inch to maintain proper seating height and comfort. Our sofa measuring guide covers this in detail.
- Width at the mounting plate — The top of the leg must fit within the frame's mounting area without overlapping edges.
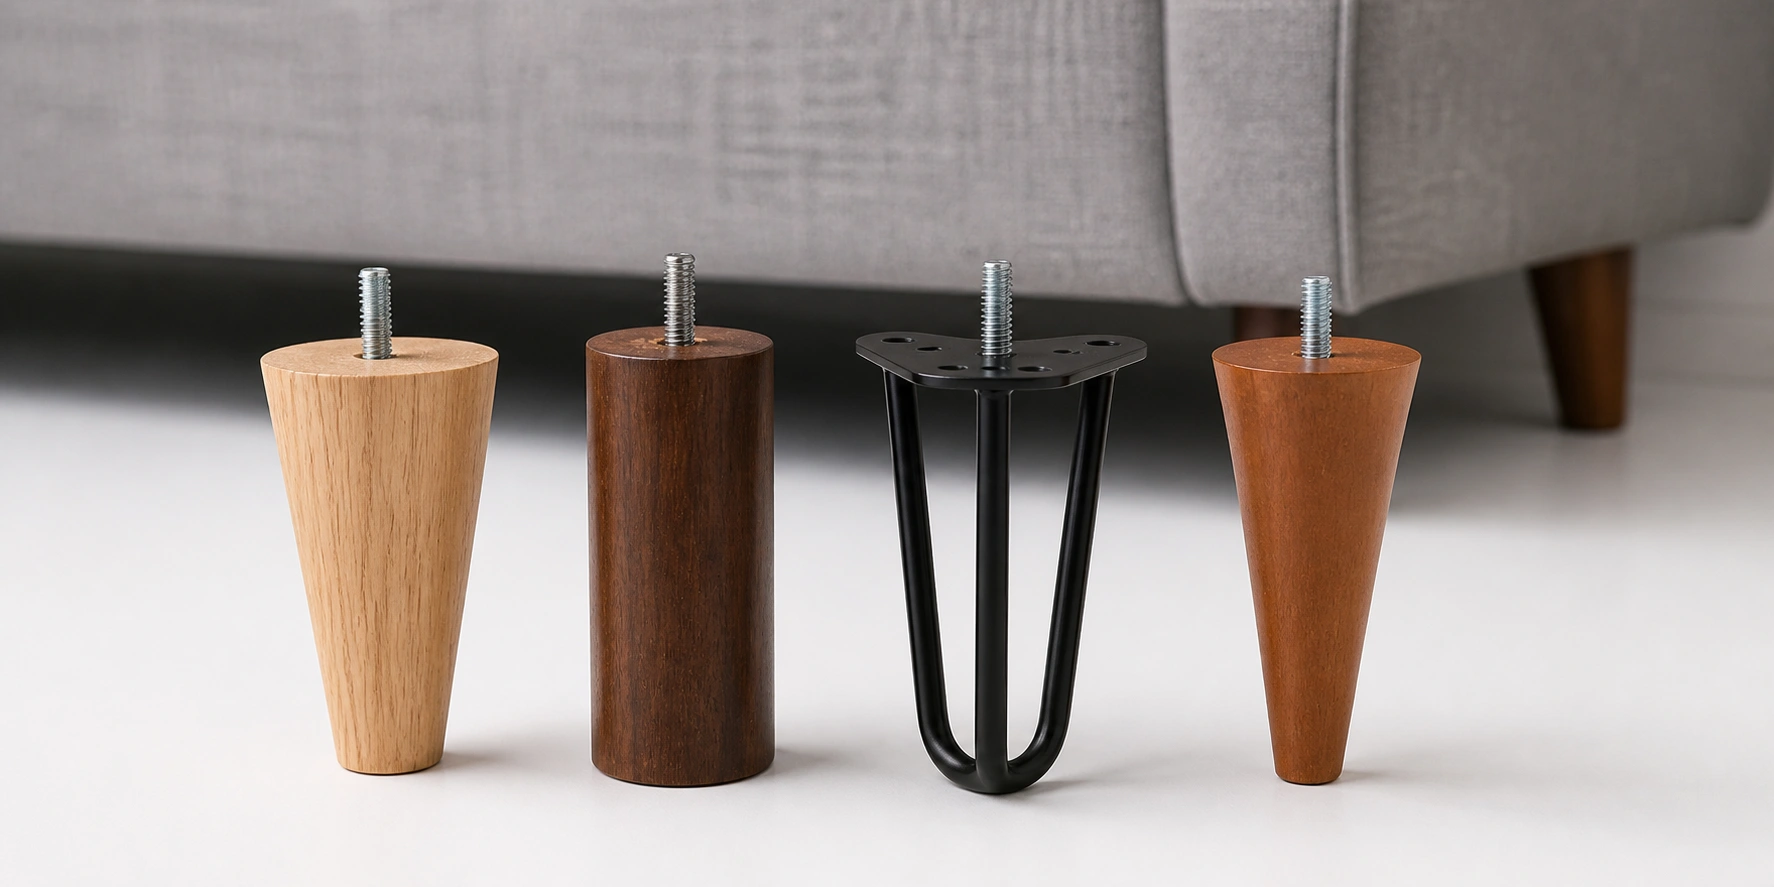
- Style and finish — Choose a style that complements your sofa. Tapered wood legs suit vintage and contemporary designs, while metal hairpin legs work well with industrial sofas. For more options, see our sofa leg replacement guide.
- Quantity — Replace all four legs even if only one is damaged. Mismatched leg heights or styles look obvious and can cause uneven weight distribution.
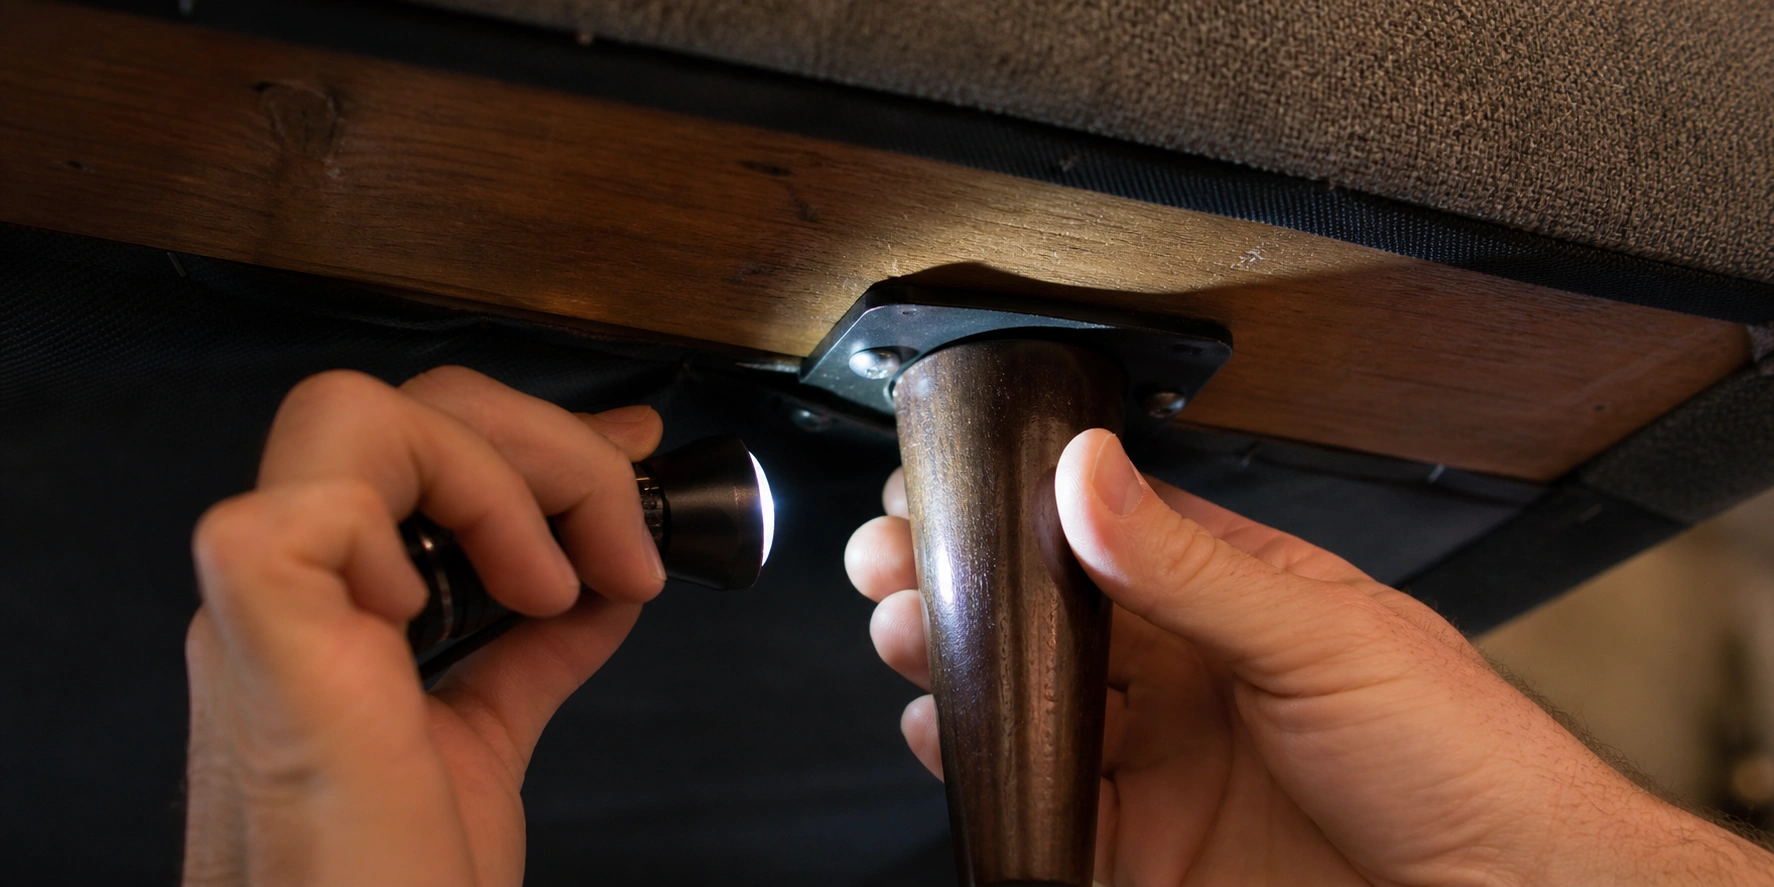
Step-by-Step Replacement Process
- Remove all existing legs by unscrewing them completely. Keep the old legs as reference for thread size and height.
- Clean the mounting holes in the frame. Remove old glue, wood filler, or debris. If the holes are stripped, use the T-nut method (Method 3) to create fresh metal threads.
- Test-fit one new leg by hand-threading it into the frame. It should screw in smoothly without forcing. If it does not fit, do not force it — you likely have the wrong thread size.
- Once confirmed, install all four legs and tighten them firmly using the appropriate wrench or Allen key.
- Place the sofa upright on a flat surface and check for level. If one corner is slightly high or low, adjustable-height legs allow fine-tuning without shims.
- Add felt pads or furniture cups to the bottom of each leg to protect your flooring and reduce future vibration-related loosening.
Before You Buy: Some sofas, particularly certain sectional sofas and modular sofas, use proprietary leg designs that are not standard sizes. In these cases, contact the manufacturer directly for OEM replacements. Universal replacement legs will not work if the thread pattern is non-standard.
Time Required: 15–30 minutes for all four legs. Cost: $15–$60 for a set of four replacement legs. Durability: New legs with proper installation should last the remaining life of the sofa.
Comparison of All Repair Methods
Use this table to quickly identify which method best fits your situation based on the type of damage, your skill level, budget, and how permanent you need the fix to be.
| Method | Best For | Cost | Time | Durability | Skill Level |
|---|---|---|---|---|---|
| Simple Tightening | Screws simply backed out; intact threads | $0 | 5–10 min | 6–12 months | Beginner |
| Wood Filler (Toothpick) | Stripped holes in wood frame | $2–$5 | 30 min + 24hr dry | 1–3 years | Beginner |
| Hardwood Dowel | Heavily stripped holes needing strong repair | $5–$10 | 45 min + 24hr dry | 3–5+ years | Intermediate |
| T-Nuts / Inserts | Bolt-on legs; permanent metal threads | $3–$8 | 20–30 min | Permanent | Intermediate |
| Corner Brackets | Cracked frame wood; lateral wobble | $4–$10 | 15–20 min | Very strong | Beginner |
| Full Replacement | Cracked/split legs; non-repairable damage | $15–$60 | 15–30 min | Long-term | Beginner |
Best Combination: For maximum durability, combine T-Nuts (Method 3) with Corner Brackets (Method 4). This creates both a permanent thread connection and a mechanical reinforcement — essentially making the leg connection stronger than it was when the sofa was new. This approach is especially recommended for heavy furniture like a Chesterfield sofa or a recliner sofa.
Preventive Maintenance Tips
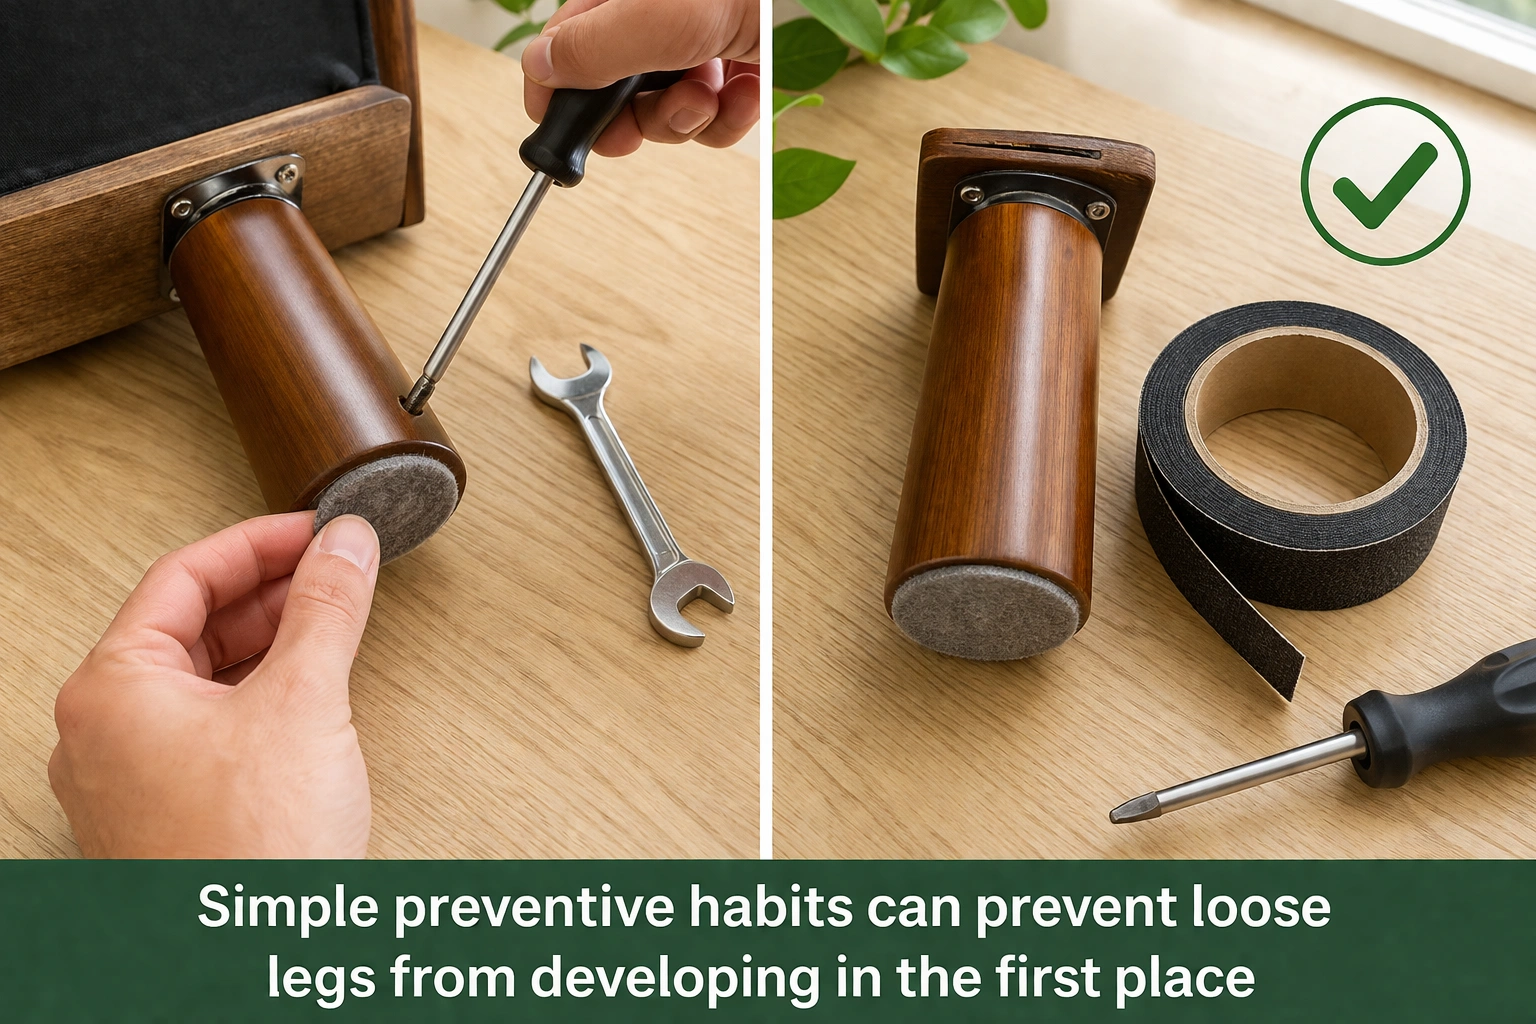
Prevention is always cheaper and easier than repair. These simple habits dramatically reduce the likelihood of loose legs and extend the overall lifespan of your sofa.
Routine Habits
- Tighten legs every 6 months — Add it to your seasonal home maintenance checklist. A quick check takes 5 minutes and catches problems before they become serious.
- Use felt pads or furniture cups — These reduce friction and vibration when the sofa is sat on or moved slightly. Less vibration means slower loosening. They also protect hardwood, laminate, and tile floors from scratches.
- Avoid dragging the sofa — Always lift the sofa when moving it, even slightly. Dragging puts enormous lateral stress on the leg joints. For heavy sofas, use furniture sliders underneath the legs.
- Address floor unevenness — If your floor has a slight slope or uneven spot, use adjustable furniture pads or shims under the appropriate legs. A sofa sitting unevenly concentrates stress on certain legs.
- Discourage jumping — Kids and pets jumping on the sofa create impact forces that loosen joints over time. This is particularly important for family sofas and households with pets.
When Buying a New Sofa
The quality of leg attachment is a strong indicator of overall sofa durability. When shopping, look for these signs of quality construction:
- Bolt-on legs with metal mounting plates — Far superior to screws driven directly into wood. Metal plates distribute force over a larger area and resist stripping.
- Hardwood frame with leg blocks — The leg should attach to a solid block of hardwood, not to a thin plywood rail. Our sofa frame materials guide explains what to look for.
- Corner blocks at stress points — Internal triangular wooden blocks at the frame corners add tremendous rigidity. You can usually feel for these by reaching under the sofa.
- Appropriate leg thickness — Legs should feel solid, not hollow or flimsy. A higher-quality sofa typically has thicker, heavier legs.
For more guidance on evaluating furniture quality, read our article on how to check sofa quality before buying. A well-built sofa from the start will need far fewer repairs over its lifetime.
When to Call a Professional
While most loose leg problems are straightforward DIY fixes, some situations require professional skills or tools. Here is when to put down the screwdriver and call for help:
- The frame rail itself is broken or split — If the horizontal rail that the leg attaches to has cracked through, this is a structural repair that may require clamping, gluing, and bracing by an experienced furniture repair technician. Attempting a fix on severely compromised frame wood can make the problem worse.
- The sofa is under warranty — Opening up the frame or modifying attachment points may void your warranty. Contact the retailer or manufacturer first.
- Multiple legs are loose AND the frame shows widespread damage — If loose legs are accompanied by cracked joints, squeaking, or frame flexing, the sofa may need comprehensive frame repair beyond simple leg fixes. Our sofa frame repair guide covers this in more detail.
- The sofa is an expensive or antique piece — High-value furniture deserves professional restoration to maintain its value. An amateur repair on a luxury piece could diminish its worth.
- You lack the tools or confidence — There is no shame in hiring help. A furniture repair professional can often fix all four legs in a single visit for $50–$150, which may be worth the peace of mind.
Need Professional Help?
If your sofa problem goes beyond simple leg tightening, our support team can point you to qualified furniture repair professionals in your area.
Contact SupportFrequently Asked Questions
No, superglue (cyanoacrylate) is not recommended for this repair. It is brittle when dry and does not penetrate wood fibers well. When the screw is driven in, the superglue bond will shatter, leaving you back where you started. Use PVA wood glue, hide glue, or epoxy instead — these penetrate the wood and create a flexible, strong bond that holds up to screw torque.
Use a caliper or ruler to measure the diameter of the threaded shaft (not the head). M8 bolts measure approximately 8mm (about 5/16 inch) and M10 bolts measure approximately 10mm (about 3/8 inch). You can also take the bolt to a hardware store and test-screw it into known M8 and M10 nuts — the correct size will thread smoothly without wobbling. When in doubt, buy both sizes; they cost less than $2 each.
If all legs are tight and the sofa still rocks, the issue is likely uneven legs (different heights), a warped frame rail, or an uneven floor. First, measure each leg's height from the frame to the bottom — if they differ, you need replacement legs of uniform height. Second, test the sofa on a known flat surface. If it is stable there, your floor is uneven and you need shims or adjustable leg pads. If it still rocks on a flat surface, the frame rail may be warped, which is covered in our sofa wobbles and uneven legs guide.
This is risky and generally not recommended. Longer screws may puncture through the frame rail into an area where they could snag fabric, scratch floors, or interfere with internal components like spring systems. If the original screw is not gripping, the solution is to repair the hole (Method 2 or 3), not to use a longer screw that may create new problems.
It is not ideal but is generally safe for short periods if the looseness is minor. However, continued use accelerates the damage — a wobbly leg puts asymmetric stress on the other three legs and the frame joints, potentially causing cascading failures. A loose leg can also suddenly give way if someone sits down forcefully, creating a fall risk. Fix it as soon as possible, and in the meantime, avoid sitting on the corner with the loose leg.
It can, but only if the new legs are a different height than the originals. Seat height affects ergonomics significantly — a sofa that is too low makes standing up difficult (especially important for seniors), while one that is too high can cause your feet to dangle. Measure carefully and match the original height within 1/4 inch. The leg style (wood vs metal, tapered vs straight) does not affect sitting comfort — only height matters.
As part of routine sofa maintenance, check leg tightness every 6 months. If your household is active (young children, large pets, frequent guests), check every 3–4 months. The entire check takes about 5 minutes — flip the sofa, try wiggling each leg, and tighten any that have play. This simple habit can prevent most loose leg problems from developing in the first place.
Continue Reading
If you found this guide helpful, explore these related topics to keep your sofa in excellent condition: