
How to Replace Broken Sofa Springs
A sagging seat or an uncomfortable dip could mean your sofa springs have given out. This complete guide walks you through identifying, removing, and replacing broken springs to restore your sofa's comfort and support.
PhanMarket Tip: Before you decide to repair or replace, understanding your sofa's spring system is essential. The right repair approach depends entirely on what type of suspension your sofa uses.
Table of Contents
- Why Do Sofa Springs Break?
- Signs Your Sofa Springs Are Broken
- Types of Sofa Springs: What You Might Have
- Tools and Materials Needed
- Step-by-Step Spring Replacement Guide
- Adjusting Spring Tension for Even Support
- DIY vs. Hiring a Professional
- Cost Breakdown of Sofa Spring Repair
- How to Prevent Future Spring Damage
- When Repair Is Not Worth It: Consider a New Sofa
- Frequently Asked Questions
Why Do Sofa Springs Break?
Sofa springs are the hidden backbone of your seating comfort. They bear weight every single day, and over time, even the highest-quality spring systems can fail. Understanding why springs break helps you both fix the current problem and prevent it from happening again.

Common Causes of Spring Failure
- Regular wear and tear: Years of daily use cause metal fatigue. Each time someone sits down, the springs compress and release. Over thousands of cycles, the metal weakens and eventually snaps or loses its tension.
- Excessive weight: Consistently placing heavy loads on one area of the sofa concentrates stress on specific springs. This is especially common on 3-seater sofas where one person always sits in the same spot.
- Moisture and rust: Humidity, spills that seep into the frame, or placing a sofa in a damp basement can cause springs to rust. Rust weakens the metal structure, making it brittle and prone to breaking.
- Poor quality construction: Budget sofas often use thinner-gauge wire springs or fewer springs per seat. If you're researching a new purchase, our guide on price vs. quality in sofas explains how spring quality directly affects longevity.
- Incorrect spring installation: If a previous repair was done poorly, or if the sofa left the factory with misaligned springs, uneven weight distribution can cause premature failure of individual springs.
- Pets jumping on the sofa: The impact of pets landing repeatedly on cushions creates concentrated force that can bend or break springs, particularly lighter-gauge zigzag springs.
Important: Broken springs don't just affect comfort. A sharp, broken spring end can tear through the fabric lining, damage cushion foam, and even pose a safety risk. Address the issue promptly rather than waiting.
Signs Your Sofa Springs Are Broken
Not all spring problems are obvious. Sometimes the damage is subtle and builds gradually. Here are the key indicators that your sofa's spring system needs attention:
Physical Symptoms You Can Feel
- Noticeable sag or dip: One area of the seat sits noticeably lower than the rest. This is the most common and obvious sign. Compare it with the sagging caused by compressed cushions — spring sag feels deeper and more structural.
- Uneven seating surface: When you run your hand across the seat with cushions removed, you feel a hard dip, a gap, or an area with no resistance.
- Popping or creaking sounds: Metal-on-metal sounds when you sit down often indicate a spring that has come loose or is rubbing against another spring. This is different from the squeaking noise caused by frame joints.
- Bumpy or lumpy feel: Instead of smooth, even support, you feel hard spots or ridges beneath the cushion.
- Spring pushing through fabric: In severe cases, you may feel or see a metal tip protruding through the dust cover or even the upholstery fabric.
How to Confirm It's a Spring Problem
To verify that the issue is indeed springs (and not just worn cushion foam), follow this simple test:
- Remove all seat cushions and set them aside.
- Press down firmly on the bare seat deck with both hands, moving across the entire surface.
- Feel for areas with no bounce-back, a hollow sensation, or a sharp metal edge.
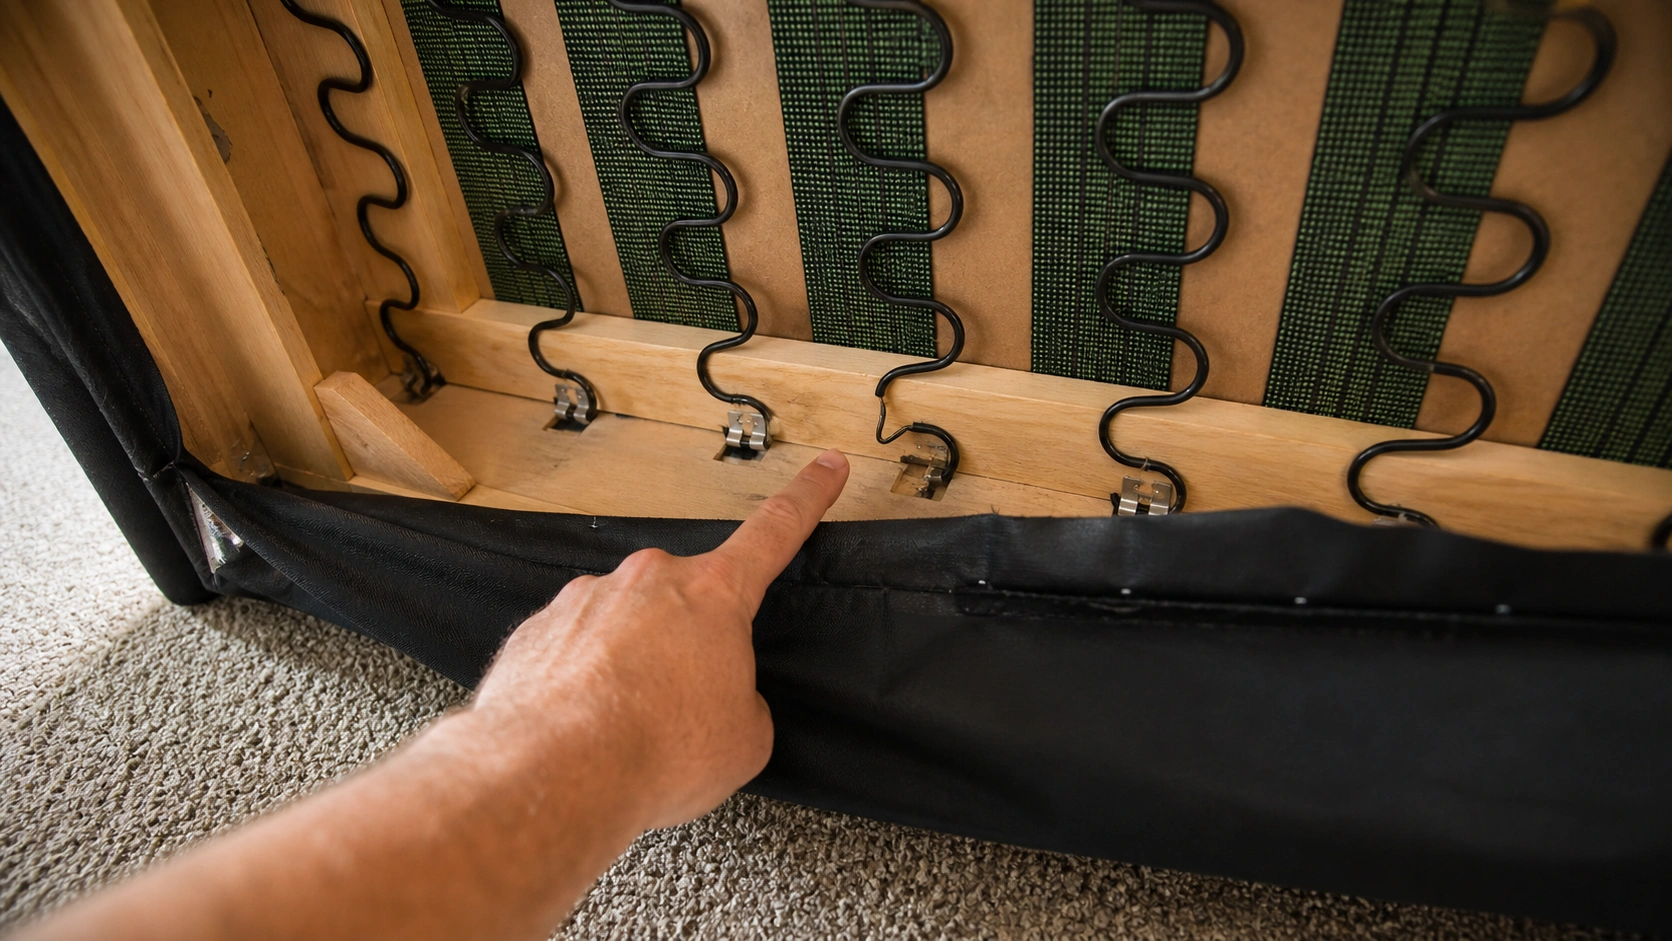
- Flip the sofa on its back and remove the black dust cover fabric on the bottom.
- Visually inspect all springs from below — look for gaps, bends, rust spots, or springs that have detached from the frame.
Types of Sofa Springs: What You Might Have
The replacement process and parts you need depend entirely on your sofa's spring type. Before buying anything, identify which system your sofa uses. For a deeper technical breakdown, see our comprehensive guide to sofa spring systems.
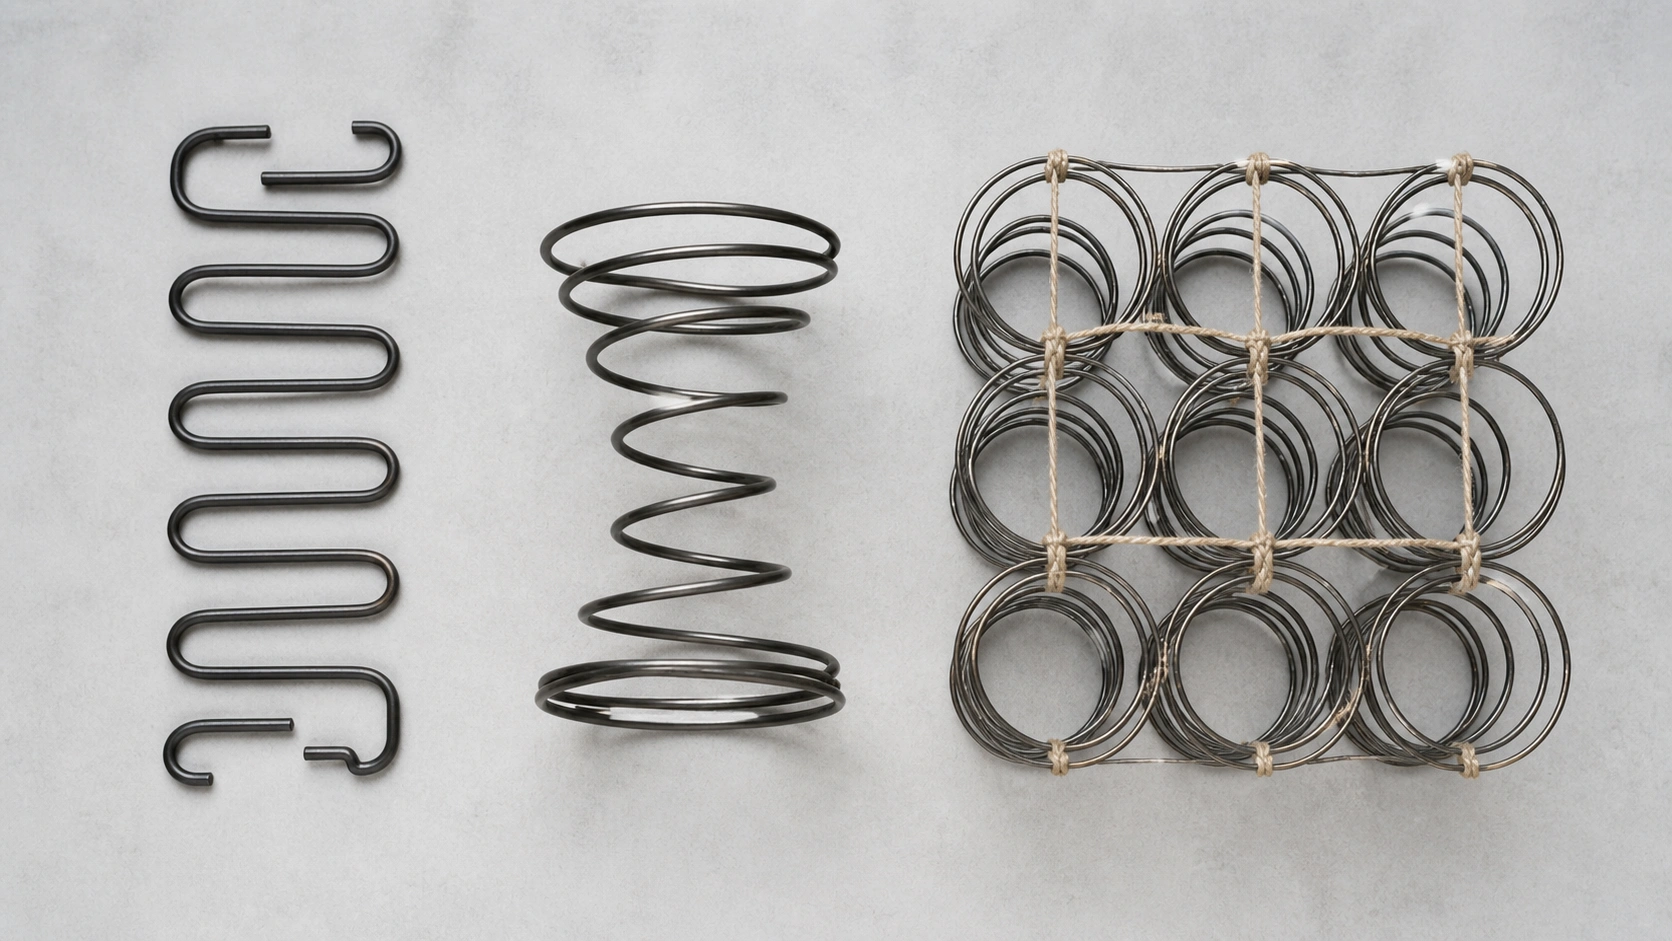
| Feature | Zigzag (Sinuous) | Coil (Bonnel) | Eight-Way Hand-Tied |
|---|---|---|---|
| Appearance | S-shaped continuous wire | Individual cone-shaped coils | Coils tied together with twine |
| Common in | Most modern sofas, budget to mid-range | Traditional sofas, some recliners | High-end, luxury sofas |
| Repair difficulty | Easy to moderate | Moderate | Difficult — usually needs a pro |
| Replacement cost | $5–$15 per spring | $8–$20 per spring | $50–$150+ per section |
| Durability | 5–10 years | 8–15 years | 15–25+ years |
| Comfort level | Firm to medium | Medium to plush | Superior, even support |
Which type do you have? About 70% of sofas manufactured in the last two decades use zigzag (sinuous) springs. They run front-to-back in parallel rows, clipped to the frame at each end. If you see S-shaped wires, that's your type. Individual cone-shaped coils point to a coil spring system. If you see a complex web of twine connecting dozens of coils, you likely have eight-way hand-tied springs.
The sofa suspension type also interacts with the spring system. Webbing, grid, or platform supports beneath the springs all affect how the repair should be approached.
Tools and Materials Needed
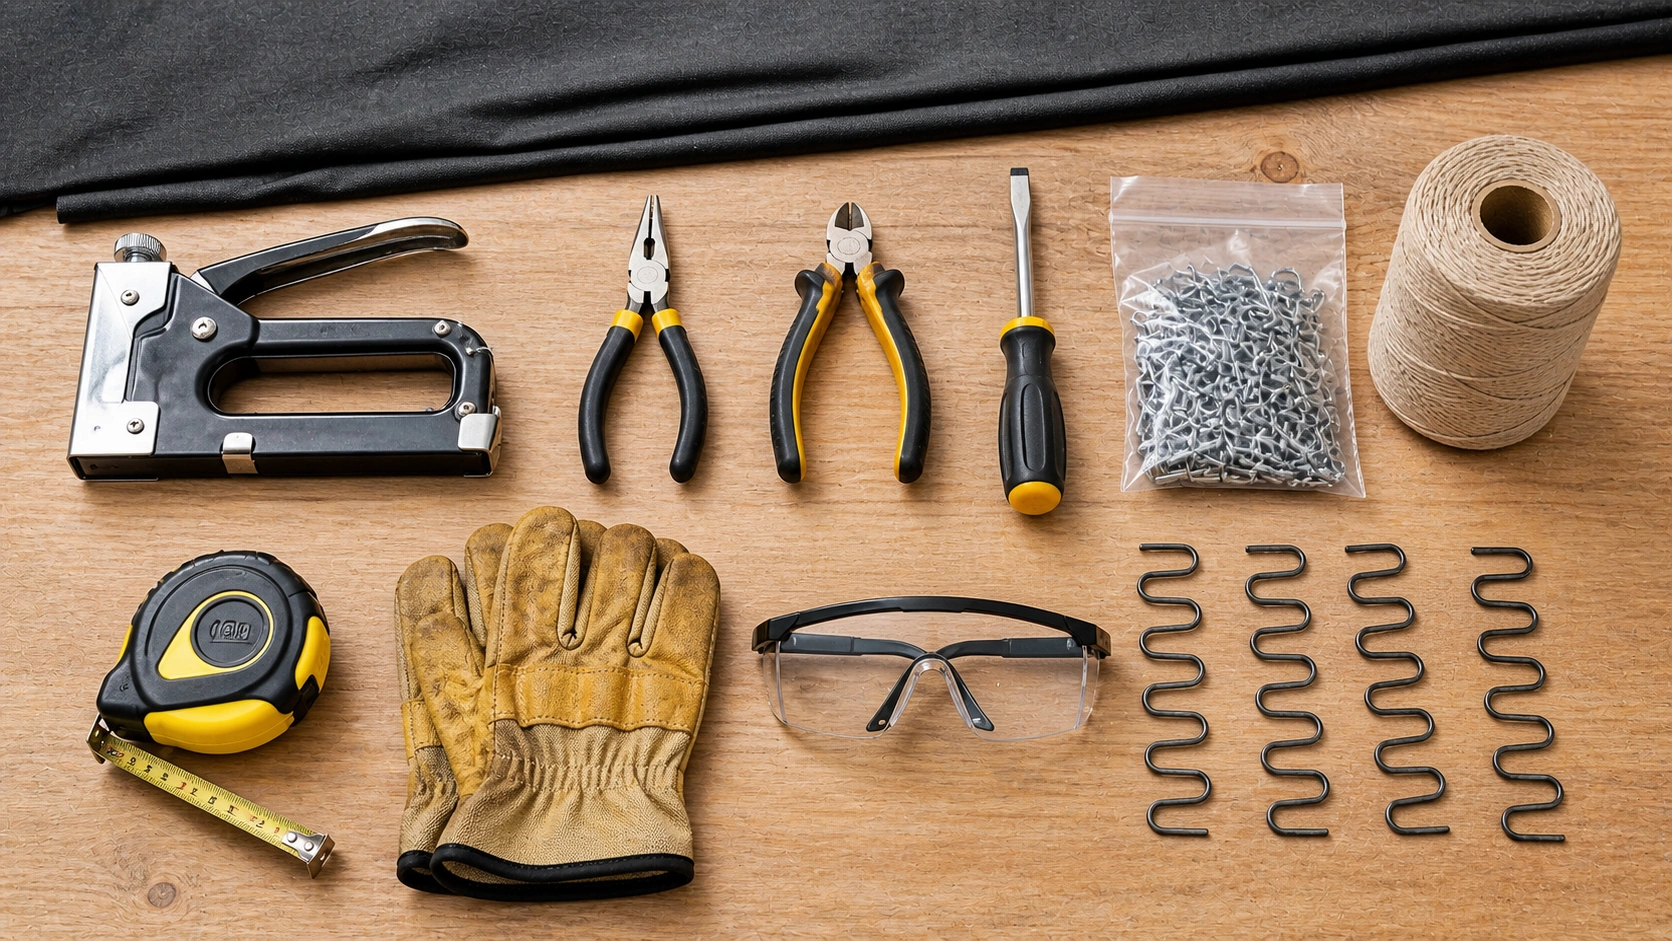
Gather everything before you start. Working on a sofa upside-down with missing tools is frustrating and can lead to mistakes. Here's your complete checklist:
Choosing the Right Replacement Springs
This is the most critical purchasing decision. Buy springs that match your existing ones in three key aspects:
- Gauge (wire thickness): Measure the wire diameter of your existing springs with calipers. Common gauges are 8, 9, and 10 gauge. Thicker wire (lower gauge number) = firmer support and longer life.
- Length: Measure the total length of the zigzag spring from end to end, or the height of coil springs. Replacement springs should be within a half-inch of the original.
- Coil count or pitch: For zigzag springs, count the number of bends. For coil springs, note how many coils per spring. More coils generally mean smoother, more even support.
Pro tip: If only one spring is broken but the sofa is over 8 years old, consider replacing all the springs in that seat section. Mixing old and new springs creates uneven tension, which feels uncomfortable and causes the new spring to fail faster from carrying more than its share of the load.
Step-by-Step Spring Replacement Guide
Follow these steps carefully. The process applies primarily to zigzag (sinuous) springs, which are the most common. Notes for coil spring replacement are included where the process differs.
Prepare the Work Area and Position the Sofa
Clear a large workspace. Lay down a blanket or drop cloth to protect your floor and the sofa's exterior fabric. Remove all cushions — both seat and back. If your sofa has removable covers, take those off as well. Carefully flip the sofa upside down so the bottom faces up. Having a second person help with this step is strongly recommended to avoid back strain or damaging the frame.
Remove the Dust Cover
The dust cover is the black or tan fabric stapled to the bottom of the sofa frame. Use your staple remover or flathead screwdriver to pry out every staple along the perimeter. Work slowly to avoid tearing the fabric — you may be able to reuse it. If it's brittle or torn, plan to replace it with new cambric dust cover fabric (available at any fabric or upholstery supply store). Set the dust cover aside.

Inspect All Springs and Identify the Damage
With the dust cover removed, you now have full access to the spring system. Visually inspect every spring. Look for: springs that have completely snapped in half, springs with visible kinks or bends, rusted areas that have weakened the wire, springs that have popped out of their clips, and clips that have pulled away from the frame. Mark each damaged spring with a piece of painter's tape or a marker so you don't lose track during the repair.
Remove the Broken Springs
For zigzag springs: Use your needle-nose pliers to open the clips at both ends of the broken spring. If clips are rusted shut, spray them with penetrating oil and wait 10 minutes. Once the clips are open, slide the spring ends out. Remove the old clips from the frame — do not reuse them. If the spring is stapled directly (some budget sofas skip clips), use your staple remover to pull the staples.
For coil springs: Cut the tie-down wires that connect the broken coil to adjacent coils using wire cutters. Then cut any clips or wires anchoring the coil to the frame webbing. Lift the broken coil out carefully — the edges can be sharp.
Safety warning: Broken spring ends are sharp. Always wear leather work gloves and safety glasses when handling damaged springs. The wire can snap unexpectedly under tension.
Prepare the Frame Attachment Points
Before installing the new spring, clean up the attachment points on the frame. Remove any old staples, clip fragments, or rust flakes. If the wood at the attachment point is splintered or softened, it won't hold a new staple securely. In that case, fill the area with wood glue and let it dry, or drill a small pilot hole and use a screw with a metal clip instead of a staple. Solid attachment points are critical — a spring that pulls loose immediately defeats the entire repair.
Install the New Springs
For zigzag springs: Slide new metal clips onto both ends of the replacement spring. Position the spring in the same location and orientation as the old one. The spring should run front-to-back (the same direction as surrounding springs). Use your staple gun to secure each clip to the frame with 2–3 heavy-duty staples per clip. Make sure the spring sits at the same height as its neighbors.
For coil springs: Place the new coil on the webbing in the correct position. The top of the coil should sit at the same height as adjacent coils. Using upholstery twine, tie the new coil to its neighbors in a zigzag (over-and-under) pattern across the tops of the coils. Pull the twine tight and tie it off securely. This is what creates the "eight-way" pattern in hand-tied systems.

Check Tension and Alignment
Press down on the new spring with moderate force. It should compress and spring back smoothly. Compare the resistance with surrounding springs — it should feel nearly identical. If the new spring feels much firmer or softer, you may have purchased the wrong gauge. If it feels slightly off, you can make minor adjustments: for zigzag springs, bending the end hooks slightly changes the effective length and tension. For coil springs, adjusting the tie-down twine tension changes the effective firmness.
Reinstall the Dust Cover and Reassemble
Stretch the dust cover fabric back across the bottom of the frame. Staple it along the perimeter, spacing staples about 2 inches apart. Pull the fabric taut as you go, but not so tight that it restricts the springs. Trim any excess fabric. Flip the sofa back upright. Replace all cushions and covers. Sit on the repaired area from several angles to confirm the fix feels right.

Adjusting Spring Tension for Even Support
Getting the tension right is what separates an "okay" repair from a "feels like new" repair. Even support across the entire seat is the goal. Here's how to fine-tune:
- For zigzag springs that feel too firm: Carefully bend the end hooks outward slightly to reduce the pre-load tension. Make small adjustments — a few millimeters of bend can noticeably change the feel.
- For zigzag springs that feel too soft: Bend the end hooks inward to increase pre-load. Alternatively, you can add a cross-wire (a wire running perpendicular between rows of springs) to distribute weight more evenly.
- For coil springs: Tighten or loosen the tie-down twine. Tighter twine restricts the coil's movement, making it feel firmer. Looser twine allows more give.
- The "hand press test": Press down on each spring with the palm of your hand using consistent force. They should all compress to approximately the same depth and rebound at the same speed. If one spring is noticeably different, adjust it until it matches.
Best practice: After adjusting tension, place a flat board (like a cutting board) across the seat area and sit on it. This simulates the weight distribution of a cushion and reveals any uneven spots that aren't obvious when pressing individual springs.
DIY vs. Hiring a Professional
Spring replacement is within reach for a capable DIYer, but it's not the right choice for every situation. Consider these factors honestly before deciding:
DIY Is a Good Choice If...
- Your sofa uses zigzag springs (simplest to replace)
- Only 1–3 springs are broken
- The frame is solid with no wood rot or cracking
- You're comfortable using basic hand tools
- The sofa isn't a valuable antique or high-end piece
- You can access the springs easily (no complex layering)
- Budget is a concern — DIY costs a fraction of professional repair
Hire a Professional If...
- Your sofa has eight-way hand-tied springs (requires specialized skill)
- Multiple springs are broken across several seat sections
- The frame is also damaged — warped, cracked, or rotted wood
- The sofa is an antique, designer piece, or has significant value
- The upholstery needs to be removed and reattached
- You've tried DIY and the result feels uneven or unstable
- The sofa is still under warranty — DIY may void it
Professional upholstery repair typically costs between $200 and $600 for spring work, depending on the sofa size and spring type. Eight-way hand-tied spring repair can exceed $1,000. If you're unsure whether your sofa is worth the investment, our sofa price breakdown guide can help you evaluate repair costs against replacement value.
Cost Breakdown of Sofa Spring Repair
Here's a realistic look at what a DIY spring repair costs. Prices are based on typical U.S. retail pricing for individual replacement parts:
DIY Repair Cost (Replacing 4 Zigzag Springs)
Compare this to professional repair costs of $200–$600, and the DIY savings are significant. However, factor in the value of your time — a first-time repair typically takes 2–3 hours. Subsequent repairs go faster as you gain confidence and familiarity with the process.
How to Prevent Future Spring Damage
Once you've repaired your sofa, take these steps to maximize the lifespan of the new springs and protect your investment:

Daily Habits That Extend Spring Life
- Rotate your seat cushions regularly: Every 1–2 months, swap cushion positions. This distributes weight more evenly across all springs instead of concentrating it on the same ones. This is especially important for sectional sofas where people tend to favor the corner seat.
- Avoid standing or jumping on the sofa: Concentrated force on a small area is the fastest way to break springs. This is the number one cause of premature spring failure in households with children.
- Don't sit on the armrests: Armrests are not designed to support body weight. Sitting on them transfers force to the frame and adjacent springs in ways they weren't built to handle.
- Use a sofa cover for pet protection: Pet-proof sofa covers reduce the impact of pets jumping on and off the furniture, while also protecting the upholstery from claws that could snag the dust cover.
Environmental Protection
- Control humidity: Keep indoor humidity between 30–50%. Use a dehumidifier in damp basements or coastal areas. Moisture is the enemy of metal springs.
- Keep the sofa dry: Clean spills immediately. Don't let liquids soak through cushions to the spring area. If the sofa does get soaked, remove cushions and let the interior dry completely.
- Avoid direct sunlight on the bottom: UV exposure can degrade the webbing and dust cover, which indirectly affects spring support. If your sofa is near a window, consider UV protection measures.
Maintenance Checks
- Annual inspection: Once a year, flip the sofa and check the springs visually. Catching a loose clip or early rust spot before it becomes a broken spring saves time and money.
- Address squeaks promptly: A squeaking noise often means a spring is rubbing against something or a clip is coming loose. Fix it early before it progresses to a full break.
- Check frame integrity: Springs depend on a solid frame. If you notice wobbling or unevenness, check the frame joints. A weak frame allows springs to flex in ways they weren't designed for, accelerating wear.
When Repair Is Not Worth It: Consider a New Sofa
As much as we advocate for repair, there are situations where replacing the sofa is the smarter financial and practical decision. Here's when to walk away from a repair:
- The frame is failing: If the wood frame is cracked, warped, or rotting, no amount of spring repair will fix the underlying problem. A sofa with a broken frame is a safety hazard. Our guide on sofa frame repair can help you assess whether the frame is salvageable.
- Multiple systems are failing simultaneously: If the springs are broken, the cushions are flat, the fabric is torn, and the frame is creaking, you're looking at a full rebuild — not a repair. The cost of restoring everything often approaches or exceeds the price of a new sofa.
- The sofa was inexpensive to begin with: A $300 sofa that needs $100 in parts and 3 hours of your labor may not justify the effort. If you're considering a replacement, our guides on budget sofas and how to choose a sofa can help you find better quality this time around.
- The sofa no longer fits your needs: If your household has changed — new family members, different room layout, new lifestyle — use this repair moment as an opportunity to upgrade to something that fits your current situation better. A modular sofa, for example, offers flexibility that a fixed-frame sofa can't match.
General rule of thumb: If the repair cost exceeds 50% of what you paid for the sofa (or 50% of the cost of a comparable replacement), and the sofa is more than 8–10 years old, replacement is usually the better long-term decision.


